Monday, November 21, 2011

DIY Cinderella Pumpkin Carriage Centerpiece


When I saw white pumpkins a few weeks ago, I immediately saw the potential for a really fun project.  How can you see a pumpkin and not think of Cinderella's fairy tale pumpkin carriage?  It took awhile to think through how to make the carriage happen, but now I'm really happy with the results! The hardest part was coming up with a practical way to make the carriage wheels--I tried to find cheap wooden wheels that I could buy, but in the end it was much easier and cheaper to make them myself.  So for a fairy tale wedding centerpiece or a fun project, here's how to make a real pumpkin carriage:

Materials for wheels:
- wire
- modeling clay
- glue and paper for paper mache
- two bamboo skewers or wooden dowels
- hot glue gun

To make the wheels:
Step 1: Twist pieces of wire to form wheels.  Make two slightly larger than the other two.  (Twist one longer piece into a circle, then make spokes by twisting three short pieces across the diameter of the circle).  Press a piece of clay into the center to hold the spokes in place.

Step 2:  Cover the wire wheel with modeling clay to make it thicker.

Step 3:  To harden the wheels, paper mache each wheel with strips of paper dipped in watered-down glue.  Let each wheel dry completely before proceeding to step 4.

Step 4:  Paint each wheel with gold paint (or color of your choice).

Step 5: Cut your wooden skewers so that the wheels will rest against the pumpkin after you attache the wheels.  (This will be about the width of the pumpkin).  Paint two skewers or dowels with gold paint.  With a hot glue gun, glue the wheels to each end of the skewer.

*An alternative way to make the wheels is to buy clay that you can bake, and simply mold the wheels and paint them after they harden.  I didn't feel like spending the extra couple dollars to buying that kind of clay--hence the wire and paper mache steps.  

Materials for carriage:
- white pumpkin (or you can use an artificial carvable pumpkin like Funkins)
- carving tools (or for me, just a knife)
- gold puffy paint
- gold ribbon
- pins

Scoop out your pumpkin and carve out the windows for the carriage on both sides of the pumpkin.  (This is actually the first pumpkin I've ever carved, so I don't have any good tips, and I'm pretty sure my carving is pretty sloppy!)  Use gold puffy paint to outline the windows.

Decorate the pumpkin with gold ribbon by pinning the ends of the ribbon on the inside rim of the hole at the top of the pumpkin and at the bottom of the pumpkin.  Use gold puffy paint to add any other detailed decoration to the pumpkin.  Attach the carriage wheels to either side of the pumpkin.  Hot glue will hold the wheels in place, but can easily fall off.  You can attach the wheels more securely by "stapling" the dowel to the side of the pumpkin by bending a piece of wire into the pumpkin on both sides of the dowel.

Light a candle inside the pumpkin and place in a ring of ivy for a cool centerpiece!

Have fun!

Thursday, November 10, 2011

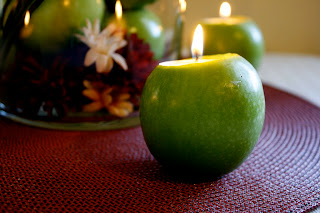
DIY Apple Candles


Yes, I am still apple-crazy!  There are so many ways to incorporate apples into a wedding theme that I just can't stop =)  Here's how to make easy apple candles for some romantic decor:

Materials: Melon baller, paring knife, tealights, apples, pen

Step 1: Trace tealight on the center of the apple.

Step 2: Use a knife to cut along the marked circle.

Step 3: Cut out the top of the apple.

Step 4: Use a melon baller to make the hole deep enough for a tealight to fit.

*here's a scooped out apple

Step 5: Place tealight in the scooped out part of the apple.

And that's it!  Make sure you scoop out enough of the apple to completely conceal the tealight~this makes it really look like the apple is the whole candle.

For an easy table centerpiece, arrange apple candles around a large vase filled with apples and flowers.

Have fun!

Monday, October 31, 2011

Apple Crisp in a Jar Favors and Place Cards

After making the apple centerpieces, I thought of many more projects to do for an apple wedding!

DIY Apple place cards:  Pin name cards to apples to make simple place cards.  (pretty self-explanatory...=P)

DIY Apple Crisp in a Jar Favors:
Pair the ingredients for apple crisp with an apple place card for a sweet favor your guests can take home and bake for themselves.

Materials: cloth square, baby food jar--thoroughly washed and filled with ingredients for apple crisp (see recipe below), ribbon/raffia, hot glue

 Step 1: Glue cloth square onto baby food jar to hold in place.

Optional: trim the corners of the cloth to make a circle (or leave the corners, depending on how much cloth you want to drape over the side of the jar).  Place lid back on the jar.

Step 2:  Secure the cloth on the lid by tying a length of ribbon or raffia around the bottom of lid.  Print out the recipe instructions on a piece of paper, roll it, and tie to the jar with the raffia.

Apple Crisp:  Place the ingredients into each baby food jar:
- 2 tbsp. all purpose flour
- 2 tbsp. brown sugar
- 2 tbsp. oats
- 1/4 tsp. ground cinnamon

* brown sugar is a good layer to use in the middle because it packs together and keeps the other ingredients from shifting.

Recipe instructions:

1.  Mix contents of jar with 1 tbsp. of butter until crumbly.
2.  Sprinkle mixture over 1-2 peeled and sliced apples in  a baking dish.
3.  Bake at 375 degrees for 30-35 minutes.

Enjoy!

Monday, October 17, 2011

Apple Bushel Centerpieces


Autumn always reminds me of going apple picking back when we were in college. I can almost smell the fresh apple donuts, too! The harvest season is the perfect time to incorporate apples in your wedding theme--and if you can find apples at 49 cents a pound (thank you Milk Pail Market!), you can breath easy over your wedding budget.

 Make fun centerpieces for your apple-themed wedding by using a bushel basket, cloth napkin, and apples. You can also label your tables by placing a numbered stake in the basket.

Materials:

- bushel basket
- square cloth napkin (or hemmed fabric of your choice)
- apples
- stake
- cardstock for table numbers
- basket filler (optional)

Step 1: Line basket with napkin. 

 Step 2: (Optional) Fill basket with basket filler (shredded paper, old newspaper, etc.)

Step 3: Attach numbered cardstock to wooden stake. 

 Step 4: Place stake in the center of the basket.

Step 5:  Arrange apples in the basket around the stake.

To imitate the checkered pattern on the cloth, I made a checkered border in Microsoft Word and printed it onto cardstock.  These table numbers were 5 inches wide and 4 inches long.

Have fun!

Tuesday, October 4, 2011

Dyed Tissue Paper Pom-Poms


Tissue paper pom-poms have become a popular wedding decoration--they are cheap, easy to make, and look so dramatic hanging from the ceiling.  After seeing my friend use them at her wedding and gushing over how cool they looked, I started thinking about how to take these pom-poms to another level.  By dying your own tissue paper, you can create a dramatic pom-pom with various splashes of color.

Dying the tissue paper:
Materials:
- food coloring
- some kind of containers (cups/shallow bowls/plates)
- non-glossy white tissue paper

Step 1: Fold sheets of tissue paper in half until you have a 1-2 inch wide strip.  Fold each strip in half lengthwise so that the ends you dye will be even on both sides.

Step 2: Mix food coloring and water in each container to make your dye.  The less water you use, the stronger the color will be.  Pictured above, I have a cup of just yellow food coloring, red food coloring, and a mixture of red and yellow to create orange.  Dip each part of the folded tissue paper into your desired color, carefully squeezing out any excess water.

Step 3: Lay out strips of tissue paper on newspaper to dry.  Wet tissue paper is very fragile, so wait until it is almost dry before you unfold it.

There are many ways you can dye your tissue paper--keep in mind that colors in the middle are much harder to see once you put the pom-pom together.  I used yellow in the middle of the tissue paper to recreate the look of a flower.  Here are a few varieties so you can see the difference between the dyed tissue paper and the resulting pom-pom:

 This pom-pom was made from a tissue paper that had a gradual change from yellow to pink.  Note how light the color is after the tissue paper dries--so keep that in mind when you are mixing your dyes.

 This pom-pom has a less subtle change from yellow to pink--note how the pink still dominates the look of the pom-pom as the yellow color is buried in the middle of the pom-pom.

You can also cut each end of the folded tissue paper before you dye it--for this pom-pom, I dyed the each strip yellow and then only dipped the edges in red dye.  It was easier to use a plate to hold the dye for dying the edges of each strip.

Making the pom-poms:
Materials:
- dyed tissue paper
- wire
- scissors
- ribbon

Step 1: Make a stack of tissue paper--12-16 sheets of tissue paper make suitable puffy pom-poms.

Step 2: Like an accordian, fold the stack back and forth until you have a fan that is between 1-2 inches wide.  Twist a length of wire around the middle of the folded fan to hold everything in place.  If you didn't pre-cut the ends of the tissue paper, use scissors to trim the ends into your desired shape.

Step 3: Separate each layer of tissue paper by pulling it up towards the center.  Halfway through the layer, flip the pom-pom over and do the same to the other side.

 Step 4:  Make a loop with the twisted wire and thread a ribbon through it so you can hang the pom-pom.

Have fun!

Monday, October 3, 2011

Mediterranean Couscous and Lentil Salad


This simple salad from Gourmet magazine has become a regular favorite at our house after I made a Mediterranean-themed dinner for my in-laws.  The fresh flavors make this salad a tasty side dish to an easy grilled chicken dinner.  The salad keeps well in the fridge for a few days and is ready-to-eat at any time! =)  Here's the recipe:

Mediterranean Couscous and Lentil Salad
Gourmet  | September 1995

INGREDIENTS:
  • 1 cup lentilles du Puy* (French green lentils) or brown lentils
  • 3 tablespoons white-wine vinegar
  • 1 1/4 cups water
  • 1 cup couscous
  • 1/2 teaspoons salt
  • 1/4 cup olive oil (preferably extra-virgin)
  • 1 large garlic clove, minced and mashed to a paste with 1/4 teaspoon salt
  • 1/2 cup finely chopped fresh mint leaves
  • 1 bunch arugula, stems discarded and leaves washed well, spun dry, and chopped
  • 2 cups vine-ripened cherry tomatoes, halved
  • 1/4 pound feta, crumbled (about 1 cup)

PREPARATION:
  1. In a small saucepan simmer lentils in water to cover by 2 inches until tender but not falling apart, 15 to 20 minutes, and drain well. Transfer hot lentils to a bowl and stir in 1 tablespoon vinegar and salt and pepper to taste. Cool lentils completely, stirring occasionally.
  2. In a saucepan bring water to a boil and add couscous and salt. Remove pan from heat and let couscous stand, covered, 5 minutes. Fluff couscous with a fork and transfer to a large bowl. Stir in 1 tablespoon oil and cool completely, stirring occasionally.
  3. In a small bowl whisk together garlic paste, remaining 2 tablespoons vinegar, remaining 3 tablespoons oil, and salt and pepper to taste. Stir lentils and dressing into couscous. Chill salad, covered, at least 3 hours and up to 24.
  4. Just before serving, stir in remaining ingredients and season with salt and pepper.
Some things I've changed after making this several times:
  • I really like using pearled couscous in this salad because its shape is more similar to the shape of the lentils.
  • Don't skimp on the garlic--I usually use up to three cloves.
  • If you can't find arugula, any spring mix blend also works well.
  • A great addition to the salad is chopped green onions (use 3-4)
Enjoy!

Thursday, September 29, 2011

We're Back!

To my one dear reader, I apologize for my absence the past month.  We have been so busy visiting family and traveling that I haven't had the time to update regularly.  Our cruise to Mexico was worth it, though!  Check out some of my favorite pics from Cabo San Lucas and Puerto Vallarta:


It started raining in Puerto Vallarta while we were out on the boat around Los Arcos.  I loved how the rain and the clouds made the landscape look so dramatic and romantic. =)

Be back soon with more DIYs!