Showing posts with label Food. Show all posts

Sunday, August 2, 2015

Recipe: Sausage and Potato Soup with Green Beans


This is not a very flattering picture, but I was lazy and this is just for documentation purposes.  =P  The shine on the soup makes it look oily in the photo, but it really isn't.  Our kitchen just has bad lighting for pictures.  I wanted to keep track of the basics for this soup, though, because again, Al liked it!  The goal for this was to use up a bunch of vegetables that I had lying around.

Ingredients:

  • 4 shallots - diced
  • ~3 lb. russet potatoes - diced
  • ~1 lb.. green beans - trimmed, cut into 1-2 in. pieces
  • leaves from around 8 sprigs of fresh thyme
  • ~ 1 tbsp. fresh rosemary
  • 28 oz. can petite diced tomatoes
  • 4 cups low sodium chicken broth
  • 1.25 lb. hot Italian turkey sausage
Directions:
  1. Heat a splash of olive oil in a hot non-stick pan and saute until the shallots become translucent and begin to brown a little.
  2. Add a little more olive oil and the potatoes.  Season with some salt and pepper and cook until potatoes begin to brown and are cooked through.
  3. Add fresh thyme and rosemary leaves (I just used a bunch from my garden - as many thyme leaves as I could pull before I got annoyed, and rosemary leaves from a 6-in. stem)
  4. Add green beans and cook for a few minutes.
  5. Transfer all the vegetables to a large pot.  Add the diced tomatoes and chicken broth and bring to a boil, then simmer on low.
  6. Cook turkey sausage in the same non-stick pan from the vegetables - crumbling it into chunks with the back of the spoon.  Drain the fat and then add to the soup.
Once the soup sat over night, the starches from the potatoes thickened it up a little and it was very yummy!

Saturday, August 1, 2015

Recipe: Cantaloupe and Cucumber Salad with White Wine Vinaigrette


Two events led to the creation of this dish: I had a delicious Summer Melon Salad at Pizza Antica last week, and then I saw cantaloupes on sale for 3 for a dollar.  It was meant to be!  I've already made this salad twice this week because Al liked it so much.

Ingredients:

  • spinach/arugula mix
  • 1 cantaloupe - cut into chunks
  • 1 cucumber - cut into chunks
  • 1 shallot (1/2 finely sliced, the other half diced)
  • 1 tbsp. fresh mint leaves - finely chopped
  • 1 avocado - sliced
For the vinaigrette:
  • ~2 tbsp. white wine vinegar
  • ~1 tbsp. dijon mustard
  • ~1/4 cup olive oil
  • freshly cracked black pepper
Directions:
  1. In a measuring cup, let the diced shallots sit in about 2 tbsp. of white wine vinegar (add for to cover if needed).  While the shallots macerate in the vinegar, chop the cantaloupe, cucumber, the other half of the shallot, and mint.  Toss them all together in a large bowl.
  2. Add 1tbsp. dijon mustard to the measuring cup with shallots and vinegar, then add olive oil until the mixture is 1/2 a cup.    Whisk everything together and season with freshly cracked black pepper.
  3. Slice an avocado and toss with cantaloupe and cucumber mixture.
  4. Toss spinach and arugula mix with just a little dressing (enough to slightly coat) and distribute to plates.  Pour the rest of the dressing over the cantaloupes and cucumbers and toss.  Mound on top of the spinach and arugula mix.

Sunday, July 26, 2015

7-Year Anniversary Dinner

I haven't posted on this blog in a very long time, but I'm resolved to continue because I just realized that I have no good way of keeping track of all the things that I have made.  The DIY crafts have kind of fizzled out a little as I got very busy with work, but if I happen to come up with ideas I will post them!  Here is the menu for a dinner I made for Al last Friday for our 7th wedding anniversary


1. Beef Wellington (Gordon Ramsay Video)
2. Artichoke and Fennel Ravioli with Tomato-Fennel Sauce
3. Golden and Crimson Beet Salad with Oranges, Fennel, and Feta
4. Bacon Hasselback Potatoes
5. Molten Chocolate Cakes (not pictured)

1. Beef Wellington

I must have watched Gordon Ramsay make Beef Wellington at least a dozen times on the video.  I also referenced Tyler Florence's Ultimate Beef Wellington Recipe as well.  The following recipe is a summary of the quantities that I used and what I did.  I have wanted to make Beef Wellington for many years now, but it was always hard to justify the expense.  I figured that our 7-year anniversary would certainly qualify!

The hardest part was actually finding a beef tenderloin that was close to 3 pounds.  I went to Costco, Sprouts, Whole Foods, and at least 5 Safeways before finding one.  Maybe they are more popular around the holidays?  Anyways, I found a 2.5 lb. beef tenderloin at Safeway for $19.99.  Safeway actually also had English mustard - Colman's mustard, and I thought that I would need to search a little more for that.

Some things to remember for the next time I make this dish: I would definitely trim my beef down into a more perfect cylinder.  I couldn't stand the thought of wasting any part of such an expensive piece of meat (our normal dinners are chicken breast that I find for 1.88/lb!), so I only trimmed some of the fat when I could have trimmed off a little more.  I also would roll out the puff pastry more to make sure that it can form a tighter wrap - the puff pastry split open on one side a leaked a little liquid when it was baking.  Otherwise, it wasn't too hard to make a successful Beef Wellington! =)

INGREDIENTS

  • 3-lb. beef tenderloin (filet mignon)
  • 700g mushrooms (1.5 lb)
  • 2 shallots
  • 4 cloves of garlic
  • 2 sprigs of fresh thyme
  • English mustard
  • 12 slices prosciutto
  • 1 lb. puff pastry
  • egg for egg wash
PREPARATION
  1. Duxelles: pulse mushrooms, shallots, and garlic in a food processor until finely chopped.  Cook in a dry pan until most of the liquid has evaporated.  Add thyme and let cool.
  2. Season beef with salt and pepper.  Heat olive oil in hot pan and sear beef on all sides.  Remove to plate and brush with English mustard while it's hot.
  3. On plastic wrap, lay the prosciutto slices side-by-side so that it creates a rectangle big enough to encompass the beef.  Sprinkle with freshly ground black pepper.  Spread mushroom mixture on top in a even layer, 1/2-inch from the edge.  Place beef on top and roll tightly with the plastic wrap.  Place in fridge for 15 minutes to firm up.
  4. Roll out puff pastry in an even layer.  Brush with egg wash and place beef-mushroom-prosciutto roll on top.  Roll tightly and wrap in plastic wrap.  Place in fridge for another 5-15 minutes.  Can be made the night before.
  5. Preheat oven to 425 degrees F.  Place Beef Wellington on a baking sheet and brush with egg wash.  Score top of pastry with the back edge of a knife, sprinkle sea salt on top.  Bake for 35 - 40 minutes (I ended up baking mind for 38 minutes) until internal temperature reaches 125 degrees (for medium rare).  Let the meat sit for 10 minutes before slicing.


2. Artichoke and Fennel Ravioli with Tomato-Fennel Sauce

This "ravioli" had a really nice delicate flavor inside with the fennel and the artichoke hearts.  I would love to make this again with actual pasta dough.  It might be the Asian in me, but these just felt like I was eating Italian-style dumplings (haha, I guess that's what stuffed pasta is) instead of ravioli.  It still tasted good though, and using wonton wrappers made the process a lot easier.

Bon Appetit December 1993

YIELD: Serves 8 (serves 8 for maybe an appetizer course, definitely not for a meal)

INGREDIENTS

Filling

  • 1 tablespoon olive oil
  • 5 large garlic cloves, chopped
  • 1/4 teaspoon fennel seeds
  • 1 9-ounce package frozen artichoke hearts, unthawed
  • 1/2 cup chopped fresh fennel
  • 1/2 cup canned vegetable broth or water (I used water)
  • 2 tablespoons minced fresh fennel fronds
  • 1 egg yolk
  • 32 to 36 gyoza (round) wrappers or wonton wrappers
  • 1 egg white
Sauce

  • 1/4 cup olive oil
  • 4 garlic cloves, chopped
  • 1 cup chopped fresh fennel
  • 1 1/4 teaspoons fennel seeds
  • 1 28-ounce can Italian tomatoes
  • 2 tablespoons tomato paste
  • 1 teaspoon dried oregano
  • 1/4 teaspoon dried crushed red pepper
  • 1/8 teaspoon ground cloves
  • Fresh fennel fronds
PREPARATION

For filling:

Heat olive oil in heavy medium skillet over medium heat. Add chopped garlic and fennel seeds and sauté 3 minutes. Add artichoke hearts and chopped fennel and stir 1 minute. Add vegetable broth and bring mixture to boil. Cover skillet and cook until vegetables are very tender, about 12 minutes. Uncover and simmer until pan juices have evaporated completely, stirring occasionally, about 10 minutes. Scrape filling into processor and cool. Add fennel fronds and process to coarse puree. Season to taste with salt and pepper. Add yolk and blend.

Line baking sheet with plastic wrap. If using wonton wrappers, trim edges to form rounds. Brush entire surface of 1 wrapper lightly with egg white. Place 1 rounded teaspoon filling in center. Fold dough over, forming semi-circle. Seal edges, pressing out any air around filling. Place on prepared sheet. Repeat with remaining filling and wrappers. (Ravioli can be prepared ahead. Cover loosely with towel and plastic wrap and refrigerate up to 8 hours, or cover with plastic and freeze 3 days. Do not thaw frozen ravioli before cooking.)

For sauce:

Heat oil in heavy large saucepan over medium-low heat. Add garlic, fennel and fennel seeds and sauté until tender, about 12 minutes. Add tomatoes with their juices and next 4 ingredients. Simmer until sauce thickens, breaking up tomatoes with back of spoon, about 25 minutes. Season with salt and pepper. (Can be made 2 days ahead. Cover; chill. Rewarm before using.)

Boil ravioli in large pot of boiling salted water until tender, about 5 minutes. Drain well. Spoon some sauce on each plate. Arrange ravioli atop sauce. Garnish with fresh fennel fronds.

3. Golden and Crimson Beet Salad with Oranges, Fennel, and Feta

Other than skipping the feta cheese in this recipe, I followed it exactly and it was just delicious!  I love the taste of the oranges and the beets together.  I will definitely make this again!

Bon Appetit October 2006

YIELD: Makes 6 servings

INGREDIENTS
  • 2 large (3-inch-diameter) red beets, all but 1 inch of tops trimmed
  • 2 large (3-inch-diameter) golden beets, all but 1 inch of tops trimmed
  • 5 tablespoons extra-virgin olive oil, divided
  • 4 oranges
  • 1 small fresh fennel bulb, trimmed, quartered, cored, cut into paper-thin strips
  • 1/4 cup finely chopped fresh mint
  • 1/4 cup finely chopped fresh Italian parsley
  • 1/4 cup hazelnuts, toasted, husked, halved
  • 1 small shallot, finely chopped
  • 1 tablespoon balsamic vinegar
  • Coarse kosher salt
  • Freshly ground white pepper
  • 1 1/2 cups coarsely crumbled feta cheese
PREPARATION

Preheat oven to 400°F. Place all beets in 9x9x2-inch metal pan. Drizzle 3 tablespoons oil over; sprinkle with salt and pepper and toss to coat. Cover pan with foil and roast beets until tender, about 1 1/2 hours. Uncover and cool completely. Peel beets, cut into 1/2-inch cubes, and place in large bowl, each color on opposite side; sprinkle with salt and pepper. Do ahead Can be made 1 day ahead. Cover and chill. Bring to room temperature before using.

Cut all peel and pith off oranges. Working over medium bowl to catch orange juice, cut between membranes, releasing segments. Add 1 cup orange segments, fennel, mint, parsley, hazelnuts, and shallot to bowl with beets. Transfer 2 teaspoons orange juice to small bowl; whisk in vinegar and remaining 2 tablespoons olive oil. Season dressing to taste with salt and white pepper. Stir into beet mixture.

Mound salad on large platter. Drain remaining orange segments; arrange on salad. Sprinkle with cheese.

4. Bacon Hasselback Potatoes

Oh man these potatoes were yummy!  They took a lot more time to make than I anticipated though - it was tricky slicing the potatoes without slicing them through, and then the bacon slices kept popping out as I tried to stuff them in between.  I ended up cutting most of the potatoes in half so that they had more room to fan out with the bacon in between them.  I used russet potatoes.

Recipe courtesy of Food Network Kitchens

YIELD: 12 servings

INGREDIENTS
  • 4 slices thick-cut bacon, each cut crosswise into 9 pieces
  • Kosher salt
  • 12 medium Yukon gold potatoes, peeled
  • 1 stick unsalted butter
  • Sea salt and freshly ground pepper
  • 2 scallions, finely chopped
  • 2 tablespoons finely chopped fresh parsley
  • 1 clove garlic, finely chopped
Directions

Lay the bacon pieces on a baking sheet and freeze until hard, about 30 minutes. Meanwhile, preheat the oven to 350 degrees F. Bring a large pot of salted water to a boil.

Using a sharp knife, make crosswise cuts in each potato, about 1/8 inch apart, stopping about 1/4 inch from the bottom.

Add the potatoes to the boiling water and cook 4 minutes. Remove with a slotted spoon and carefully transfer to a baking sheet; let cool slightly. Pat the potatoes dry, then insert 3 pieces of the frozen bacon into the cuts of each potato, spacing the bacon evenly and letting it poke out of the top. Melt 5 tablespoons butter and brush generously over the potatoes and in the cuts. Reserve any excess butter for basting. Season the potatoes with salt and pepper.

Transfer the potatoes to the oven and bake until the outsides are browned and crisp, about 2 hours, basting halfway through with the reserved melted butter.

When the potatoes are almost done, melt the remaining 3 tablespoons butter and mix with the scallions, parsley and garlic. Spoon over the potatoes and roast 5 more minutes. Transfer to a platter and season with salt and pepper.

5. Molten Chocolate Cakes

These cakes were super rich and chocolate-y.  They were so rich that we ran out of ice cream to eat with each bite and had to scoop some more out.  It was very easy to make and had a gooey chocolate center after I baked it for 12 minutes.  For the ramekins, I brushed them with butter and then dusted it with cocoa powder instead of flour because I saw Gordon Ramsay do that with his Chocolate Fondant (another recipe I wanted to try, but it calls for golden caster sugar and that is hard to find in the States)

YIELD: 4 servings

INGREDIENTS
1 stick (4 ounces) unsalted butter
6 ounces bittersweet chocolate, preferably Valrhona
2 eggs
2 egg yolks
1/4 cup sugar
Pinch of salt
2 tablespoons all-purpose flour

DIRECTIONS

1. Preheat the oven to 450°. Butter and lightly flour four 6-ounce ramekins. Tap out the excess flour. Set the ramekins on a baking sheet.

2. In a double boiler, over simmering water, melt the butter with the chocolate. In a medium bowl, beat the eggs with the egg yolks, sugar and salt at high speed until thickened and pale.

3. Whisk the chocolate until smooth. Quickly fold it into the egg mixture along with the flour. Spoon the batter into the prepared ramekins and bake for 12 minutes, or until the sides of the cakes are firm but the centers are soft. Let the cakes cool in the ramekins for 1 minute, then cover each with an inverted dessert plate. Carefully turn each one over, let stand for 10 seconds and then unmold. Serve immediately.

MAKE AHEAD
The batter can be refrigerated for several hours; bring to room temperature before baking.

I ended up making enough food to give us a total of 3 gourmet dinners!  The leftovers were delicious.  To reheat the beef wellington, I put slices on a baking sheet and baked in a 350 degree oven for 8 minutes.  They end up cooking a little bit more (becoming medium instead of medium rare), but get warm enough for Al to eat and are still tender and flavorful.

Friday, December 23, 2011

Rice Krispies Treat Star Favors


Rice krispies treats are a classic snack that are easy to turn into a fun favor for a holiday party, a bridal shower, or even your wedding.  All you need to do is make the original Rice Krispies Treats recipe and let your creative juices flow!  I made stars for a holiday party and was very happy with how easy they were to make:

The Original Treats (from Ricekrispies.com)
Ingredients:
  • 3 tablespoons butter or margarine
  • 1 package (10 oz., about 40) regular marshmallows
  • - OR -
  • 4 cups miniature marshmallows
  • 6 cups Rice Krispies®
Directions:
  1. In large saucepan melt butter over low heat. Add marshmallows and stir until completely melted. Remove from heat.
  2. Add KELLOGG'S RICE KRISPIES cereal. Stir until well coated.
  3. Using buttered spatula or wax paper evenly press mixture into 13 x 9 x 2-inch pan coated with cooking spray. Cool. Cut into 2-inch squares. Best if served the same day.
To make the stars:
 1. Press the rice krispies mixture onto a pan as thick or as thin as you want the stars.  I made my stars thinner because I wanted to make more out of the batch.  Use a cookie cutter to cut out stars.

 2. Dip the blunt end of a bamboo skewer into melted candy coating or melted chocolate and insert into cut-out star.  This will help the skewer stay in place.  If you have a thicker star cut out, you could also use lollipop sticks.  If using bamboo skewers, trim off the pointed end with kitchen shears.

3.  Once the stars are set in the skewers, coat with melted candy coating (I used Wilton's) and decorate with sprinkles.  I had originally planned on dipping the whole star in melted candy coating, but after I tested one it was just way to sweet for the treat, so I just spread the candy coating like icing on one side of the star.

Have fun!

Friday, December 2, 2011

DIY Caramel Apples

This is my last apple project for a long time, I promise!  I have wanted to make my own caramel apples for a long time, and I was thrilled to discover that it was incredibly simple.  Homemade caramel apples would be the perfect wedding favor for a fall or apple-themed wedding.  You can make them well in advance, and the simple ingredients make it an affordable project, too.

DIY Caramel Apples

A simple way to make caramel apples is to dip them into melted caramel squares that you buy from the store.  However, making your own caramel is actually quite simple and can save you a lot of money if you are making a lot of caramel apples.


Ingredients: 
  • 1 cup butter (no substitutes)
  • 2 cups packed brown sugar
  • 1 cup light corn syrup
  • 1 (14 ounce) can sweetened condensed milk
  • 2 teaspoons vanilla
  • 8 -10 wooden sticks
  • 8 -10 medium tart apples
Directions:
  1. Insert 1 wooden stick into each apple.
  2. In a heavy saucepan, combine the butter, brown sugar, corn syrup and milk; bring to a boil over medium-high heat.
  3. Cook and stir until a candy thermometer reads 248 degrees (firm ball stage) about 30-40 minutes and for a softer caramel cook just to a few less degrees.
  4. Remove from heat; stir in vanilla.
  5. Dip each apple into hot caramel mixture; turn to coat
  6. Holding by the stick, sprinkle with nuts or whatever you desire while the caramel is still warm (work quickly the caramel sets up fast).
  7. Set on generously buttered wax paper to cool (make certain to generously butter the paper).
Note: if making a double recipe make two recipes in two separate pots.

I used Wilson's cookie sticks because I liked the look of a white stick instead of a wooden one.  You can also warp the sticks with ribbon or decorate it to make it look more elegant.  I wanted a softer caramel, so I heated my caramel to 245 degrees, and was very happy with the texture.  I rolled the leftover caramel into balls and Al and I nibbled on them for days afterwards!  I also placed the dipped apples on parchment paper and had no issues with sticking.


To decorate the apples, I melted semi-sweet and white chocolate chips in the microwave and scooped the melted chocolate into plastic ziplock bags.  I cut one corner off the plastic bag and used it to pipe chocolate onto the caramel apple.  (Of course, if you have a pastry bag, you could just use that).  I hate doing dishes and cleaning up, though, so it was nice just to toss the bags once I was done!

DIY caramel apple wedding favors

Lastly, since I was giving these apples away, I wrapped them in plastic treat bags from the Daiso store in Mountain View.  The small apples were the perfect size for these bags.  I placed a piece of parchment paper at the bottom of the bag just to prevent sticking, but I don't think it was actually necessary.

Also, this is what happens when I leave apples lying around an unattended husband: =P  He also hid them under plates and bowls and it took me a while to get them all back!

Have fun!

Monday, October 3, 2011

Mediterranean Couscous and Lentil Salad


This simple salad from Gourmet magazine has become a regular favorite at our house after I made a Mediterranean-themed dinner for my in-laws.  The fresh flavors make this salad a tasty side dish to an easy grilled chicken dinner.  The salad keeps well in the fridge for a few days and is ready-to-eat at any time! =)  Here's the recipe:

Mediterranean Couscous and Lentil Salad
Gourmet  | September 1995

INGREDIENTS:
  • 1 cup lentilles du Puy* (French green lentils) or brown lentils
  • 3 tablespoons white-wine vinegar
  • 1 1/4 cups water
  • 1 cup couscous
  • 1/2 teaspoons salt
  • 1/4 cup olive oil (preferably extra-virgin)
  • 1 large garlic clove, minced and mashed to a paste with 1/4 teaspoon salt
  • 1/2 cup finely chopped fresh mint leaves
  • 1 bunch arugula, stems discarded and leaves washed well, spun dry, and chopped
  • 2 cups vine-ripened cherry tomatoes, halved
  • 1/4 pound feta, crumbled (about 1 cup)

PREPARATION:
  1. In a small saucepan simmer lentils in water to cover by 2 inches until tender but not falling apart, 15 to 20 minutes, and drain well. Transfer hot lentils to a bowl and stir in 1 tablespoon vinegar and salt and pepper to taste. Cool lentils completely, stirring occasionally.
  2. In a saucepan bring water to a boil and add couscous and salt. Remove pan from heat and let couscous stand, covered, 5 minutes. Fluff couscous with a fork and transfer to a large bowl. Stir in 1 tablespoon oil and cool completely, stirring occasionally.
  3. In a small bowl whisk together garlic paste, remaining 2 tablespoons vinegar, remaining 3 tablespoons oil, and salt and pepper to taste. Stir lentils and dressing into couscous. Chill salad, covered, at least 3 hours and up to 24.
  4. Just before serving, stir in remaining ingredients and season with salt and pepper.
Some things I've changed after making this several times:
  • I really like using pearled couscous in this salad because its shape is more similar to the shape of the lentils.
  • Don't skimp on the garlic--I usually use up to three cloves.
  • If you can't find arugula, any spring mix blend also works well.
  • A great addition to the salad is chopped green onions (use 3-4)
Enjoy!

Tuesday, April 26, 2011

Roasted Vegetable Pasta

Basically made with what was around the house, I decided to record this "recipe" because I liked how it turned out and I want to remember it for next time. The measurements are also general estimates...but this sauce is so flexible you really can't go wrong!

Roasted Vegetable Pasta


Ingredients:
  • 2 Italian squash, chopped
  • 1 yellow bell pepper, chopped
  • ½ red onion, chopped
  • ½ white onion, diced 
  • 3 cloves garlic, minced
  • 2 tbsp. balsamic vinegar
  • ¼ c. tomato paste 
  • ½ c. red wine 
  • 2 -14 oz. cans diced tomatoes, drained 
  • 1 tsp. crushed red pepper, or to taste
  • 1 lb. pasta, cooked according to package directions 
Directions: 

1. Toss diced squash, bell pepper, and red onion with olive oil (1-2 tablespoons) and sprinkle with salt and pepper. Roast for 25-30 minutes in 450° oven.

2. Meanwhile, heat a tablespoon of olive oil over medium heat. Add onions and sauté until softened. Add garlic and sauté for another minute or so.

3. Add balsamic vinegar, tomato paste, and red wine. Turn up heat and reduce sauce by half. Add diced tomatoes, crushed red pepper, and bring to a simmer.

4. Stir in roasted vegetables, toss with cooked pasta.


I also made some breaded chicken tenders on the side, topped with melted parmesan cheese for Al. =)

Sunday, January 2, 2011

Moroccan Beef Meatball Tagine

You might have noticed from my pictures, but a lot of our meals consist of rice with some kind of saucy meat topping.  While I try to cook a lot of different kinds of meals, Al really likes food that is easy to eat so he can "shovel food faster into his pie hole."  This tagine (or stew) is a favorite of ours!  It's easy, flavorful, and we makes plenty for leftovers. =)

(Hmmmm, again I am not a photographer....or a food artist....so maybe this picture doesn't look as appetizing as it should...=P)


Bon Appetit

Meatballs: 
  • 1 1/2 pounds ground beef (20% fat) 
  • 1/3 cup coarsely grated onion 
  • 1/3 cup panko (Japanese breadcrumbs)* 
  • 1/4 cup chopped fresh cilantro 
  • 1 large egg, beaten to blend 
  • 2 garlic cloves, minced 
  • 1 teaspoon turmeric 
  • 1/2 teaspoon cayenne pepper 
  • 1/2 teaspoon ground cinnamon 
  • 1/2 teaspoon ground nutmeg 
  • 1/2 teaspoon freshly ground black pepper 
  • 1/2 teaspoon coarse kosher salt 
  • 1/4 teaspoon ground ginger 
Stew: 
  • 1 tablespoon olive oil 
  • 3 1/2 cups chopped onions 
  • 4 garlic cloves, minced 
  • 2 cinnamon sticks 
  • 1 teaspoon turmeric 
  • 1/8 teaspoon saffron threads, crumbled 
  • 2 cups beef broth 
  • 1 14.5-ounce can diced tomatoes in juice 
  • 1/4 cup golden raisins 
  • 2 cups 1/2-inch-thick carrot slices (cut on diagonal) 
  • 1/4 cup chopped fresh cilantro plus additional for garnish 
  • 1 5-ounce package baby spinach leaves


For meatballs: 
Line large rimmed baking sheet with plastic wrap. Gently mix all ingredients in large bowl. Using moistened hands and scant 2 tablespoonfuls for each, roll meat mixture into 1 1/2-inch meatballs. Arrange meatballs on sheet. 


For stew: 
Heat oil in heavy large ovenproof pot over medium heat. Add onions; sauté about 15 minutes. Add garlic, cinnamon, turmeric, and saffron; stir 2 minutes. Add broth, tomatoes with juice, and raisins.

Preheat oven to 350°F. Bring stew to simmer. Stir in carrots. Carefully add meatballs to stew; gently press into liquid to submerge. Sprinkle 1/4 cup cilantro over. Cover pot; place in oven. Bake until meatballs are cooked through and carrots are tender, about 35 minutes. Sprinkle spinach over stew. Cover and bake until spinach wilts, about 5 minutes longer. Gently stir to mix in spinach, being careful not to break meatballs. Remove cinnamon sticks. Season tagine with salt and pepper.

Some notes~
  • I've never used saffron because I can't bring myself to buy the actual spice.  It might make it taste even better, but we still like it as it is.  Instead, I serve the stew with saffron rice (like the mahatma saffron rice) to make up for not getting the spice.
  • When we are out of cinnamon sticks, I just saute the onions with about a tsp. of ground cinnamon and it tastes the same.

Sunday, December 5, 2010

Pork and Hominy Stew

On Wednesday, I made a stew that reminded me of this Simpson's episode:

Lisa:     I’m going to become a vegetarian.
Homer: Does that mean you’re not going to eat any pork?
Lisa:     Yes
Homer: Bacon?
Lisa:     Yes Dad
Homer: Ham?
Lisa:     Dad all those meats come from the same animal
Homer: Right Lisa, some wonderful, magical animal!

This wonderful, magical animal provided the pork, bacon, and ham that went into this Pork and Hominy Stew recipe from Bon Appetit!

 This picture doesn't really show much, but again this is just for record keeping purposes because I will want to remember to make this stew again!  According to wikipedia, hominy is "is dried maize kernels which have been treated with an alkali in a process called nixtamalization."  To me, hominy is just big corn kernels that I buy in a can. =) 

Anyways, this stew was really delicious without having to add very many spices.  I used a combination of my regular chili powder (whatever is 50-cent kind is from Wal-Mart) and ancho chili powder, and doubled the vegetables as I usually do just to try to make our dinners slightly healthier.  Serve with a side of cornbread--yum!

Saturday, November 27, 2010

Thanksgiving 2010

Thanksgiving was a busy day for the Hos!  We had a wonderful visit from the newly-engaged Dan and Yuan Yuan in the morning who were in town.  Again, congratulations to the adorable couple!  So meal number one consisted of pancakes with strawberries, turkey sausage, and balsamic-onion omelettes with salsa.  (sorry, breakfast, no more details about you because turkey dinner steals the show)

While I missed having a big Thanksgiving dinner with our families back home, I was still excited to cook a big meal here for (originally) two.  Then we more than doubled our size with the wonderful addition of three friends to our party.  Here is this year's menu--I was so ready to eat that only one picture is from me, but everything turned out just as awesome as it looks in the magazine pictures anyway (please note the totally serious tone of that statement).

The Recipes:
 

 I've always liked the idea of a turkey roulade because I think it looks cool and fancy.  However, I'm not sure that stuffing a turkey breast really changes the flavors in anyway--I think next time if I don't want to do a whole turkey, I'd rather just roast a turkey breast and make the stuffing separately.  (I was a big fan of this sausage stuffing!)  Also, not pictured is the Jell-O that we had for dessert =P  I don't have a mold, but I basically made the same Jell-O mold that we used to make for holidays at my house (involving canned whole cranberry sauce, canned fruit, nuts, and red jell-o).

This is a terrible picture, but it is evidence of our meal. =)  Already looking forward to next year's Thanksgiving!!!

Needless to say, I am thankful for stretchy sweatpants with plenty of elastic.

Tuesday, November 23, 2010

Rice Burgers

World travelers~did you ever eat rice burgers in Taiwan (or other Asian country?)  I was reminiscing about the rice burgers we tried at Mos and at Mcdonald's in Taiwan recently and had a craving to try to make some.  So, I pressed some sticky rice into a patty, fried it up, and sandwiched chicken tempura, homemade teriyaki sauce, and asian coleslaw between two rice patties to make my own version.  It was a bit messier than buying it in Taiwan, but still fun enough that I think I will do it again!

I think the pictures are pretty self-explanatory~


Yum!  Also, for reference, I like to use this recipe for teriyaki sauce from allrecipes.com.  The only change I make is that I add honey to sweeten the sauce and tone down the acidity from the vinegar.

Tuesday, November 16, 2010

Watermelon Smoothies

The Problem:
Two thirsty people have half of one big watermelon and are too lazy to slice the watermelon to eat it.

The Solution:
Use an ice cream scoop to scoop out watermelon.  Place in blender with ice, a dash of sugar, and a squeeze of lime.  Result: Watermelon Smoothies! =)


Al got really good at making these.  The proportions are about 2 cups of watermelon, 1 cup of ice, 1 tbsp. of sugar, and the juice of half a lime.  In retrospect, maybe these weren't really less work than just cutting up the watermelon and eating it (maybe about the same?) but they were definitely more refreshing!

Saturday, November 13, 2010

Country Captain Chicken

Recipes:

I still don't know what exactly country captain chicken means, but based on the recipe we used I'm assuming it means something yummy and delicious!  The curry mix was a little annoying to make in the recipe because you had to grind a lot of spices, but I thought it was worth it.  I also used boneless chicken breast (on sale!) cut into bite size pieces because Al likes easy-to-eat meals.  I was really surprised by just how tender the meat became when it finished baking in the oven!  The coconut rice was also really good, and it just makes me sad that the coconut milk has to add fat to our meal.  (Again, worth it).  I will definitely make coconut rice again for any other curry-like dishes.

The red onions had a wonderful sweet flavor from the pomegranate molasses.  Now that I finally bought a jar of pomegranate molasses, I can't wait to go back and look for recipes that I've skipped over in the past since I never felt like buying it.  In my opinion, the gremolata did not enhance the dish at all (I think it was the orange zest) and I would rather just sprinke some parsley and fresh pomegranate seeds over the onions instead.

Disclaimer:  I did not originally mean to post so many pictures of food and recipes, but we love to eat so here they are!

Saturday, November 6, 2010

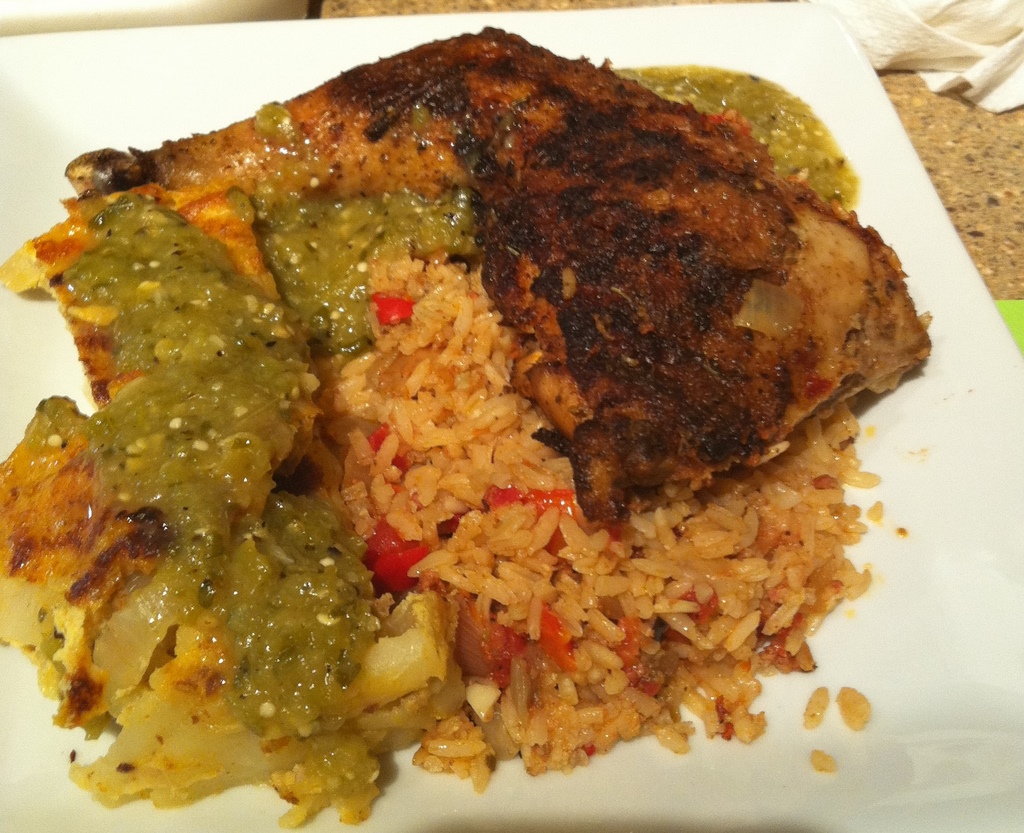
Arroz con Pollo with Salsa Verde

Spanish Themed Dinner Night:

Recipes:


Instead of a whole chicken, I used 5 chicken legs because that was what was on sale and therefore in my fridge.  =)   I think I would continue to use chicken legs in the future since bone-in chicken breasts just take so long to finish cooking in the oven.  I also used canned tomatoes with green chilies because that was also in our pantry--I don't know if the green chilies made any difference, but it was delicious!  As usual with baked chicken recipes, I always have to bake the dish longer for the chicken to finish cooking.  This time, it took about 25 extra minutes.

For the salsa verde, I used a Bon Appetit recipe because I wanted to try a more authentic salsa verde recipe with tomatillos.  For the record, I used 4 jalapenos.

Lastly, I made the Spanish-style potato omelet in order to use up a lot of eggs that were sitting around in the fridge.  Instead of making the mayonnaise topping with the recipe, we just ate it with the extra salsa verde.


The full meal pictured above.  No, I am not a photographer.  No, I am not an iron chef (no plating points!).

Thursday, October 28, 2010

Halloween Cupcakes

In the spirit of the "holiday" season--here is my favorite Halloween cupcake recipe from Bon Appetit.  The cupcake is a pumpkin flavored cupcake with cream cheese frosting.  The proportions for cream cheese frosting are what I use for all other cupcakes that I make, and they are really easy to remember!  If you want to make a chocolate cream cheese frosting, just add a bit of cocoa powder to the frosting mixture.

Last year, I found some great images of Halloween cupcakes and really wanted to make some cute ones.  What came out were these little monsters (sorry, I don't remember where I originally saw how to make these) made with candy corn, necco wafers, and chocolate clay eyeballs.  Instead of chocolate clay, you could use chocolate frosting or mini m&ms.  I just thought it would be fun to try making chocolate clay (which is just melted chocolate and corn syrup).

Happy Halloween!!

Tuesday, October 19, 2010

Grilled Mediterranean Dinner

Al and I were excited to officially host our first dinner in our new place last Sunday!  Thanks to Cliff and Anna for putting up with our incredibly small table and lack of living room furniture. =P  This is really just for my sake to remember what recipes I used because I always seem to forget what recipes I use and what I changed.  Maybe at some point I'll start taking more pictures and coming up with original recipes.  Ha.

Menu:
  • Grilled Chicken and Pork Skewers and rice
    • Ina Garten's Marinated Lamb Kebabs recipe (used chicken instead of lamb)
    • Michael Symon Pork Souvlaki recipe (only used marinade)
  • Tzatziki Sauce with Toasted Pita Bread (also serve hummus and tapenade on the side)
  • Tomato and Tapenade Tarts (loosely adapted from a Bon Appetit recipe)
  1. cut a sheet of thawed puff pastry into four rectangles; score a 1/2 inch border around each edge
  2. spread a layer of tapenade inside each rectangle (homemade: mince together 1/2 can of black olives, handful of green olives, 1 roasted red pepper, 2 cloves garlic, mix with 1 tbsp. lemon juice; season to taste)
  3. top rectangles with thinly sliced tomatoes and mozzarella cheese; splash tomatoes with balsamic vinegar
  4. bake at 400 degrees for 20 minutes, top with fresh basil leaves