Saturday, November 6, 2010

Arroz con Pollo with Salsa Verde

Spanish Themed Dinner Night:

Recipes:


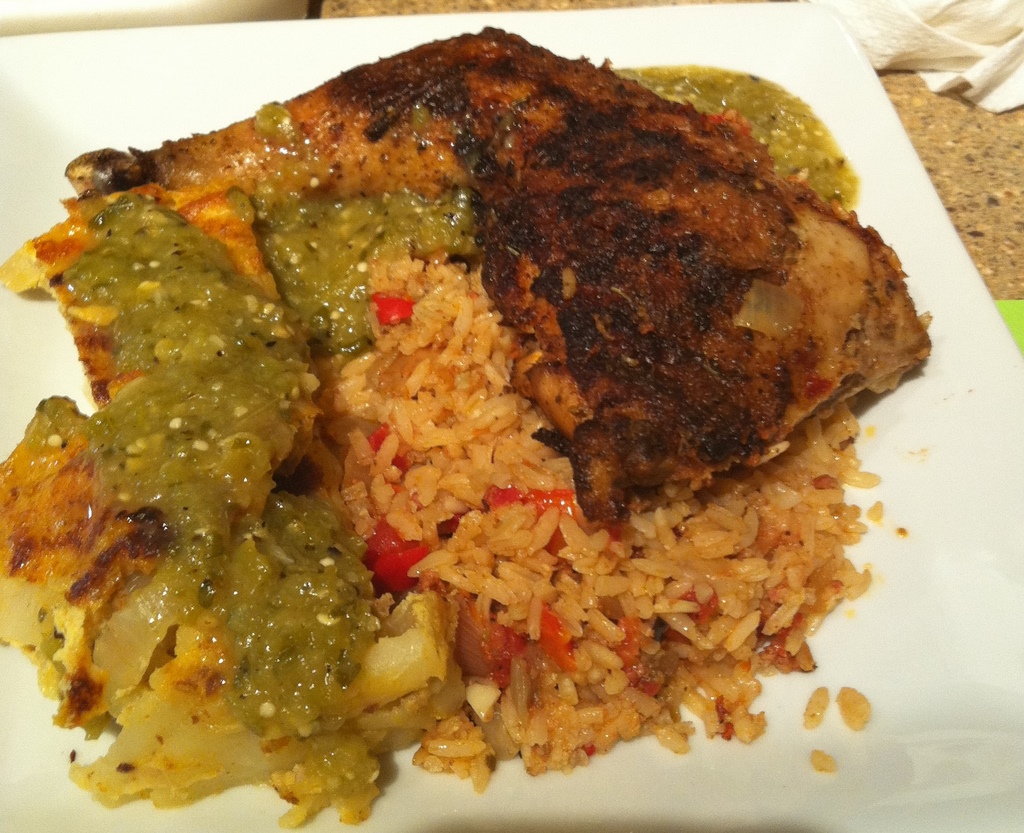
Instead of a whole chicken, I used 5 chicken legs because that was what was on sale and therefore in my fridge.  =)   I think I would continue to use chicken legs in the future since bone-in chicken breasts just take so long to finish cooking in the oven.  I also used canned tomatoes with green chilies because that was also in our pantry--I don't know if the green chilies made any difference, but it was delicious!  As usual with baked chicken recipes, I always have to bake the dish longer for the chicken to finish cooking.  This time, it took about 25 extra minutes.

For the salsa verde, I used a Bon Appetit recipe because I wanted to try a more authentic salsa verde recipe with tomatillos.  For the record, I used 4 jalapenos.

Lastly, I made the Spanish-style potato omelet in order to use up a lot of eggs that were sitting around in the fridge.  Instead of making the mayonnaise topping with the recipe, we just ate it with the extra salsa verde.


The full meal pictured above.  No, I am not a photographer.  No, I am not an iron chef (no plating points!).

Thursday, November 4, 2010

Wedding DIY: Ribbon-laced paper cones


Background:
Grace and I made these paper cones for her wedding and they were surprisingly easy and fun to make!  The shimmery, linen-washed cardstock made the cones look super elegant for her wedding and they were only 20 cents each! (on sale at Joann Fabrics).  I thought that lacing the ribbon on the cones would be a nice touch since the back of Grace's dress was laced up with a really long ribbon.  So here's how it's done:


Materials:
  • Cardstock
  • Ribbon
  • A Yarn needle or sturdy tape
  • Scissors or X-acto knife
  • Hot glue gun
  • Flowers
Directions:
  1. Make a template.  (If making more than one cone, mark a single sheet of cardstock with where to cut holes.  Then reuse the sheet so you know where to cut the holes in the rest of the sheets) 
a.       Cut the square of cardstock to 10 x 10 inches.  Position the square in the shape of a diamond and, for the purpose of these instructions, imagine each corner is a cardinal direction (North, East, South, and West)
b.      Make a mark 2.25 inches to the right and left of the West and East corners
c.       Draw a line connecting each mark to the South corner
d.      Measure one inch from the top of each line and make a mark.  Then make three marks at every 1.5 inch increment
e.      Now at every 1.5 inch increment, make a mark 0.75 inches to the left and right of the line.  See the first picture in the slideshow for details.  These 8 marks will be the holes through which the ribbon will be laced.  Make mirroring marks on the other line.
 
2. Using scissors or a knife, cut slits wide enough for ribbon to be laced through each mark.  (Tip: cut the cardstock over a board of Styrofoam.

3. Cut a strand of ribbon—48 inches.  If you don’t have a yarn needle, tape each end of the ribbon with tape and cut to a point.  (This will make it easier to thread through the cardstock)
 

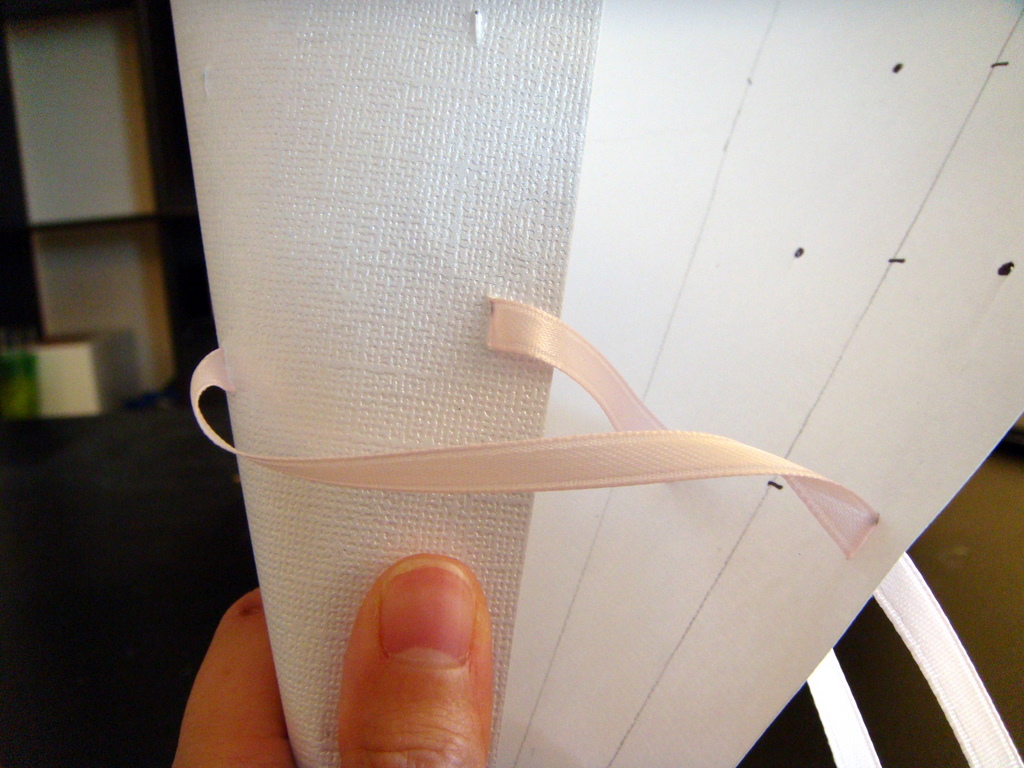
4. Starting at the bottom two holes from the inside of the cardstock (the wrong side), lace ribbon through and make sure both ends are the same length.
  
5. Roll cone into shape so that the holes align with each other.   Lace the ribbon as if lacing your shoelaces.  TIP: lace one side at a time and keep the cone loose until the ribbon is in place.  Then hold cone steadily in place and pull ribbon tight.


6.       If desired, tie a bow at the top of the cone. 

7.       Use hot glue to secure the edge of cardstock against the cone. 

8.       Fill the cone with flowers and string ribbon through the top of the cone so that you can hang it where you wish.

Have Fun!

Thursday, October 28, 2010

i heart five guys

The Five Guys in Sunnyvale officially opened today!!!!!

YAY!!!!

Any dieting/work-out plans are officially postponed until tomorrow.  Tonight I am happy enough to lounge around as my stomach attempts to digest over 1000 calories. *contented sigh*

Halloween Cupcakes

In the spirit of the "holiday" season--here is my favorite Halloween cupcake recipe from Bon Appetit.  The cupcake is a pumpkin flavored cupcake with cream cheese frosting.  The proportions for cream cheese frosting are what I use for all other cupcakes that I make, and they are really easy to remember!  If you want to make a chocolate cream cheese frosting, just add a bit of cocoa powder to the frosting mixture.

Last year, I found some great images of Halloween cupcakes and really wanted to make some cute ones.  What came out were these little monsters (sorry, I don't remember where I originally saw how to make these) made with candy corn, necco wafers, and chocolate clay eyeballs.  Instead of chocolate clay, you could use chocolate frosting or mini m&ms.  I just thought it would be fun to try making chocolate clay (which is just melted chocolate and corn syrup).

Happy Halloween!!

Tuesday, October 26, 2010

Bridal Shower Gift: DIY Apron


 This is another belated project post for an apron that I made during the summer for a very special friend! =)  When I first decided that I wanted to make an apron as a bridal shower present for Grace, I was instantly overwhelmed with just how many free apron patterns there are out there on the internet.  I spent so much time looking around and they all made me want to make dozens and dozens of different aprons.  (See 56 Free Apron Patterns just for a taste!)

I finally settled on using this Retro Apron Pattern, and just changed it a little by attaching the straps at the top (instead of the knots) and making a sash across the middle.  I also made the flounce a little longer so that it would have a little more bounce.  Now, I am by no means an accomplished seamstress but I think it came out all right considering I did it all by hand. I also never got around to adding pockets.  (Is that braggy?)

I LOVED the fabric when I saw it at the store because Grace has a cat and a dog, and her kitchen is red.  Since the fabric was so light, I layered another layer of fabric underneath.  The above pattern was a great one to use for layering lighter fabrics since the two layers get sewn together as you sew the double fold bias tape.

I've now also seen hostess aprons that look like fun dresses, and I would really like to make a dressy apron for fun.  Watch out, I may have a post for it soon.....

Saturday, October 23, 2010

DIY Favors with Tissue Paper Flowers

Tissue Paper Flowers
Make tissue paper flowers in a variety of colors to add a special touch to your wedding day.  These elegant flowers can be made in different sizes to accent favor boxes or to gather into bouquets.  See Martha Stewart Weddings for a full tutorial on how to make these shaped tissue bubble flowers.
You will need:
  • tissue paper
  • styrofoam ball (1/2 inch)
  • floral wire
  • artificial stamens
  • floral tape
Tips:
- Dab a dot of glue at the edge of each petal to prevent them from unraveling. Regular Elmer's glue works well.
- Crumpling a piece of paper into a small ball can also be used instead of a styrofoam ball.


Favor Idea
Pictured above is an example of a wedding favor that is accented with these tissue paper flowers.  These favors reflect an elegant beach-themed wedding by using tropical elements and colors without using the expected sand and seashells.  The orange tissue paper and teal ribbon also reflect the wedding colors.
Materials used for the favor:
  • tealight candle holder (IKEA Galej, $1.49 for 4)
  • white pillow mints
  • raffia ribbon
  • shell beads
  • ribbon
  • bamboo skewers
  • cardstock for names
  • tissue paper flowers
Steps:
  1. Cut strips of ribbon to wrap around the bottom of the candle holder.  Ribbon will stay best if secured with a dab from a hot glue gun.
  2. Punch a hole through cardstock nametag, thread a bead on raffia ribbon, and tie a bow to attach the nametag to the bamboo skewer
  3. Use clear tape to hold bamboo skewer in place inside the candle holder (Otherwise the skewer will lean or fall over)
  4. Fill the bottom of the candle holder with pillow mints and top with a tissue flower.
Have fun!

Tuesday, October 19, 2010

Grilled Mediterranean Dinner

Al and I were excited to officially host our first dinner in our new place last Sunday!  Thanks to Cliff and Anna for putting up with our incredibly small table and lack of living room furniture. =P  This is really just for my sake to remember what recipes I used because I always seem to forget what recipes I use and what I changed.  Maybe at some point I'll start taking more pictures and coming up with original recipes.  Ha.

Menu:
  • Grilled Chicken and Pork Skewers and rice
    • Ina Garten's Marinated Lamb Kebabs recipe (used chicken instead of lamb)
    • Michael Symon Pork Souvlaki recipe (only used marinade)
  • Tzatziki Sauce with Toasted Pita Bread (also serve hummus and tapenade on the side)
  • Tomato and Tapenade Tarts (loosely adapted from a Bon Appetit recipe)
  1. cut a sheet of thawed puff pastry into four rectangles; score a 1/2 inch border around each edge
  2. spread a layer of tapenade inside each rectangle (homemade: mince together 1/2 can of black olives, handful of green olives, 1 roasted red pepper, 2 cloves garlic, mix with 1 tbsp. lemon juice; season to taste)
  3. top rectangles with thinly sliced tomatoes and mozzarella cheese; splash tomatoes with balsamic vinegar
  4. bake at 400 degrees for 20 minutes, top with fresh basil leaves